Registration tips and tricks
Looking for ways to make class searches and registration a little easier? Here are a few tips and tricks to help you out.
Check your Registration Status! Before registration begins log in to myOswego. The Registration Tab has a link, "Check your Registration Status." It will tell you if you have any holds that will prevent registration, when you can register, your current major and minor, who your assigned advisor is and other useful bits of information. We suggest you do this a good week or two before registration opens so you have enough time to make any needed changes and register as soon as you can.
Class Search - search GenEd using the "Attribute Type" search box. All GenEd attribute descriptions begin with "GE". You can also search Attributes like "Upper Division" or "English - Theories".
Class Search - use "Campus" to limit your results. You can limit to Main campus, Online, etc. If you're living on campus, you may not want to see courses at the Syracuse Branch Campus in your results. Campus is in the "Advanced Search" of the Registration and Planning interface.
Class Search - Combine Search Criteria. You've got several search parameters - use them together to limit your results. Be careful, though - too restrictive of a search will give you no results.
"Registration and Planning" Overview (Video).
Degree Works and Registration Plans (Video).
Do Your Research! Clicking on a course title in the new registration interface will pop up a window full of useful information, including Restrictions, prerequisites, attributes and more.
Email your schedule, add it to your calendar (Video). In the "Register for Classes" area the of new registration interface, there's an email icon ( ) in the upper right-hand corner of "Schedule and Options". You can also find it in the "View Registration Information" area. In addition to the text in the email, an .ics file is attached that can be downloaded and added to your google calendar. Google tells you how.
Keyword Searches
Keyword - Enter partial words you want to find. The search returns sections that match the partial keywords entered.
Keyword (With All Words) - Enter all the words you want to find. The search uses AND logic. Sections returned contain all of the words entered.
Keyword (With Any Word) - Enter any of the words you want to find. The search uses OR logic. Sections returned contain at least one of the words entered.
Keyword (Exact Phrase) - Enter the exact phrase you want to find. Sections returned contain the exact phrase entered. Do not use any special characters in the exact phrase.
Keyword (Without The Word) - Enter the word you do not want to find. This option must be used with another Keyword search field, such as All, Any, Partial, or Phrase. Results contain the words entered in the Keyword (With Any Word) and Keyword (With All Words) fields but do not contain the word entered here.
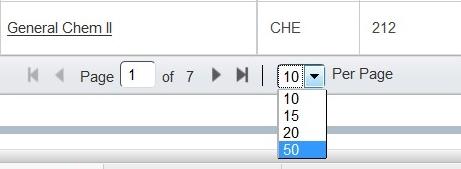
Search Results - Control How Many You See. By default, 10 results show on a page. You can adjust this:
Search Results - sort 'em! Click on Title, Subject, Course Number, Section or CRN to sort your results.
Control What You See. There are several controls that allow you to choose what is displayed on your screen:
The gear icon (![]() ) lets you select what columns of information will show.
) lets you select what columns of information will show.
In the "Register for Classes" area, window sizes can be controlled with panel toggles (![]() ).
).
The "Panels" button (![]() ) will show/hide the Schedule and Summary sections.
) will show/hide the Schedule and Summary sections.
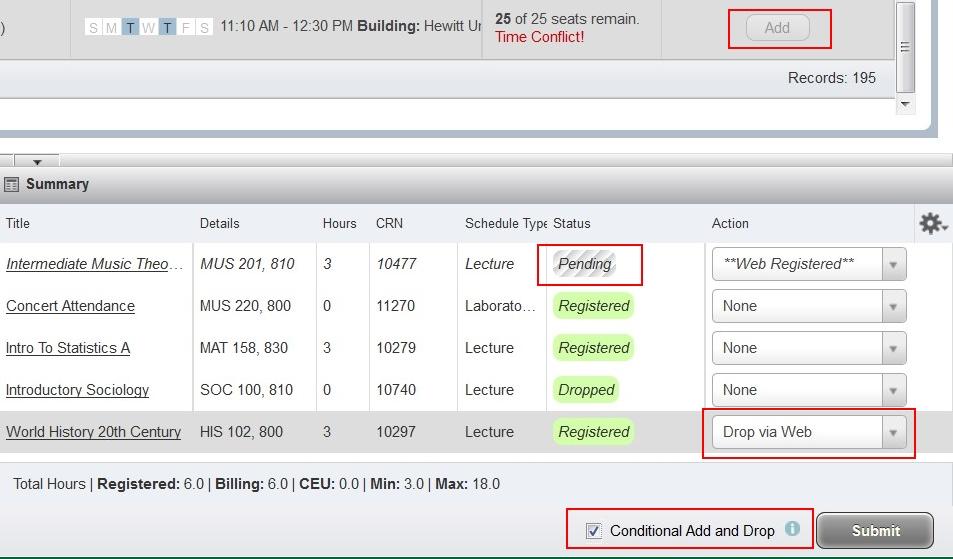
Conditional Add and Drop - need to drop a class in order to add another? Don't want to risk it? Add the new class to your "summary" area. Change the "Action" for the class you're dropping to "Drop via Web". Check "Conditional Add and Drop" and Submit. Your existing class will only get dropped if the new one can be added without error. If there is an error, your existing class stays.
Linked Courses - Add All. If courses are linked (two sections must be taken together) click the "View Linked" button (![]() ). You will see every combination available. Find the combination you like and click the "Add All" button.
). You will see every combination available. Find the combination you like and click the "Add All" button.
Have a tip or trick you'd like to share? Email it to us!


